 Sanding seems like a relatively simple task. The goal is to smooth out a surface to prevent bumps or splinters right? Believe it or not, there are some cases in which you would prefer to make a surface rougher or only sand certain sections. There are several tricks to sanding that become relevant in home DIY projects, so we want to share those tips with you to get you started.
Choosing the Right Tool
As we mentioned, there are different types of sandpaper for different tasks. Coarse sandpaper lets you knock down rough edges and sand faster due to the larger aluminum oxide particles in the paper. This is usually for smoothing out rough edges on cut pieces of drywall or wood, but making a surface rougher can also help with primer adhesion, depending on what you’re painting.
Finer sandpaper is intended for smoothing out the surface you have just sanded. Typically you start with lower grit sandpaper and work your way up into finer grits until the surface is as smooth as desired. Depending on what you are sanding, you could end up at 2000 grit from 100.
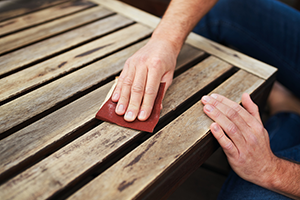
There are also several ways to use sandpaper. Wrapping it around a block is a common way to ensure it stays flat and you can maintain a strong grip. This works well for flat surfaces, but cupping the sandpaper around an edge is a bit easier for tasks like smoothing out cut drywall edges.
If you want to sand a large surface area, we recommend an orbital sander. Orbital and hand-held power sanders enable you to sand much larger surfaces than you might by hand. These tools can cover a lot of areas quickly, but you need to be careful because it is possible to oversand an area due to the efficiency of these tools.
Protection
That covers the tools, but it is very important to take proper precautions when sanding. Many people neglect to wear proper safety gear and put themselves in danger from the particles in the air. This dust isn’t good to breathe, but if you are sanding something with dangerous materials it becomes even more deadly.
Wearing a proper face mask is critical to avoiding dust inhalation. We recommend combining this with safety goggles for complete face protection. You will be covered in dust and don’t want to risk getting any in your eyes. Depending on the materials we also recommend that you wear gloves to protect your hands or more safety equipment if necessary.
Finally, ensure you have a vacuum cleaner on hand. Keep the work area clean as much as possible to avoid the dust traveling outside the work area. Many power sanders, like those mentioned above, have built-in features to draw in dust and minimize particles. These features are useful but don’t entirely negate the build-up of dust in the air.
Those are a few of our tips for proper sanding! It is easy to pick up a sander, but it is important to ensure you know how to use it properly to avoid harming yourself or others. If you have any questions, make sure to reach out to our team!