 Plaster is a wonderful tool for decorating and protecting the walls in your home. It is durable, resistant to scratching, and can add some beautiful texture to an otherwise simple room. However, applying it is tougher than it sounds. It is a complicated process that requires a step-by-step guide, which we’re going to provide here.
Preparation
The most obvious and crucial step is mixing. It may seem simple, but there are a few precautions you need to take when mixing plaster. First, ensure you are in a safe location. Wear a dust mask and lay down coverings to protect from spills. You don’t want to try and clean this mixture off the floor if something goes wrong. You can also add a plastic lining to your bucket if you don’t want to deal with the cleanup.
Begin adding water to the bucket. It should be near room temperature water, not hot. Try following the instructions on the bag, but be aware that most people tend to underestimate how much water you need. Less is more, though, as you can always add more later.
Next, grab a bag of your chosen plaster brand. Depending on the brand the plaster particles might vary in size, so how they capture detail and cling to the wall may have some slight variation. Open the bag of plaster and carefully sift it into the bucket, evenly distributing it over the water. Don’t dump the plaster, but try to work quickly, as the plaster will begin to set. The plaster will sink to the bottom of the bucket initially, but when it begins to sit on top of the water for a few seconds before disappearing, you’re close to having enough. Add a bit more, then let it sit for 1-2 minutes to reduce air bubbles.
Mixing
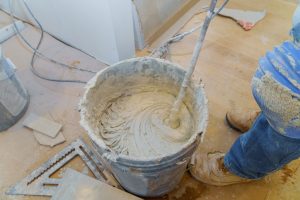
Now you can finally begin mixing. You have to be very careful during this process, as air can become trapped in the plaster, which will make applying it to the walls evenly incredibly difficult. There are two options when mixing plaster: an electric mixer or, quite literally, by hand.
If you’re using an electric mixer, make sure to keep the blade deep into the plaster. The goal is to ensure that it doesn’t spray, introduce air bubbles, or poorly mix the plaster with the water. Do this for a few minutes until the plaster appears to be mixed. Then, remove the mixer, ensure there are no glaring problems, and mix for a bit longer.
If you’re using your hand or a manual tool, begin by putting on a glove. The glove will protect you from plaster cleanup and ensure you don’t get any on yourself. Take the tool and use it much like you would stir pancake batter. Place it near the bottom of the bucket and move it back and forth to mix the particles and water. Once the plaster appears to be mixed, remove the implement and check for any air in the plaster. Mix again if you’re uncertain. You can follow this same procedure, but simply use your hand instead of a tool.
After all of this is completed you are ready to pour your plaster. If you want to learn more about pouring plaster or simply want to contact a professional to help you with plaster application, contact us!